Recover deleted tables in BigQuery using time travel
This article explains how to use the Time Travel feature in BigQuery, to query an earlier version of a table, or to recover it if it has been deleted.
Did you know you can recover deleted tables in BigQuery? The Time Travel feature is quite handy and lets you query a table the way it looked at a specific point in time (within the time travel window), and—although by slightly different means—it is also possible to recover them if they had been deleted completely.
If you (or another person or process) has made an update to a table, and you want to revert that or analyze the changes a bit deeper, you can use the FOR SYSTEM_TIME AS OF modifier on the FROM clause:
SELECT *
FROM `mydataset.mytable`
  FOR SYSTEM_TIME AS OF TIMESTAMP_SUB(CURRENT_TIMESTAMP(), INTERVAL 1 HOUR);
This, unfortunately though, will only work if the table still exists. If it doesn’t exist, we need a shell command to recover the table, e.g. using the Cloud Shell terminal. (It has other interesting use cases, e.g. an easier way to schedule data transfer backfills.)
In this situation, we don't query the table as such, but we can copy the recovered version of the table to an existing dataset. If you've never used the Cloud Shell, it can be invoked by a neat little button on the top menu row:
Then you need to authorize it:
Now we can run this code (a GA4 streaming table example, see an explanation why we'd do this a bit further down):
bq cp analytics_123456789.events_intraday_20250619@1750406400000 another_dataset.events_intraday_20250619The number after the "@" sign is a timestamp at which the table (hopefully) still existed, and we’d like to recover the table from. (In this case, 8am on the 20th June, sometime before the daily table arrived.)
To get the timestamp for the datetime you’d like to specify in the command above, you can use a converter or use this code in the shell itself:
date -d '2025-06-20 8:00:00.00' +%s000
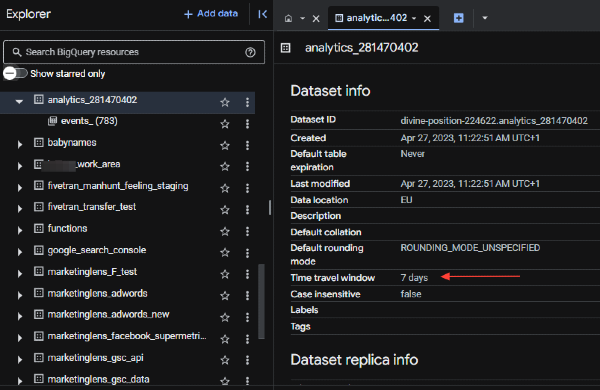
Ta-daa: the table in question is available again. Of course, this operation can only be done within the window of the time travel. You can check it in the dataset details, default for GA4 data is 7 days:
So one can safely state that it's an all-around handy recovery tool to undo inadvertent changes. But, as the example above implies, it can also have a specific use in the analysis of GA4 export data.
If you use the intraday tables in creating reports, sometimes the question comes up how “stable” that data is, i.e. how much the results in the report will change once they’re loaded again from the daily table. (Spoiler alert: not much, but there may be occasions where it's worth checking.)
The business case: one of the main reason intraday tables are used is to ensure that GA4 data is always available for “yesterday”. When the streaming export is not switched on, we can only rely on the daily tables which can arrive at any point during the next day - in extreme cases that can be in the afternoon. In these cases, if a piece of code runs e.g. at 10am in the morning to create a report, this report will not actually update (and have data for the previous day) if the daily table is getting delayed.
(Side note: there is a way to schedule a script in a way that it runs upon the arrival of the daily table, originally by Simo Ahava and then revamped by Raphael Calgaro - but it still won’t help us here because at 10am the stakeholders need a fresh report and we’re not getting it either way.)
So by switching on streaming and using it in the processing query, you can ensure yesterday’s data (from the intraday table) is included in the report. And as mentioned above, we might need to test the daily table against the intraday table, and show how much it changes, and whether “yesterday’s” data (if it comes from the intraday table) can be trusted.
This is one GA4 related example where recovering tables could be handy. I hope this helps or you’ve found this interesting!
Now it's your turn!
I hope you've enjoyed this tutorial and feel a bit more confident to utilise your own Google Analytics data in BigQuery. Drop a line in the comments if you have any questions, feedback or suggestions related to this article.
