Setting up the Data Transfer for Facebook Ads
This article walks through the Facebook Ads Data Transfer end-to-end, both on the Meta and the BigQuery side, and aims to call out its typical pitfalls and shortcomings.
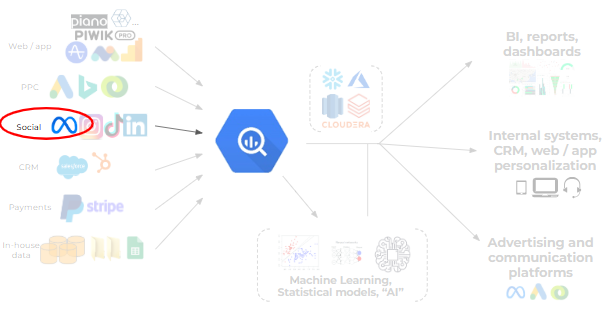
An obvious crucial task for digital marketing specialists is to report on the performance of campaigns — this is no different in the Meta world. Those companies who use BigQuery may want to ingest this data into the database, so that it can be joined up with GA4 data or stacked together with other advertising channel data, to establish a comprehensive reporting framework.
Getting data from Facebook is not as straightforward as it is from Google Ads. From the latter, you can easily pull data into Looker Studio through a built-in API connector, and setting up the Google Ads data transfer to BigQuery is quite straightforward too. (Though finding your way in the maze of >100 tables takes a bit more effort — but that's for another time.)
For Facebook (or now "Meta") Ads, you'd typically have to code up your own connector or use a 3rd party tool like Fivetran, Supermetrics, Airbyte or the likes; and these typically come with a cost (or significant set-up effort). This is now changed by BigQuery's updated Data Transfer for Facebook Ads, which provides a free option to get this data into BigQuery, where we can analyze it in greater detail, or join it with other data sources.
This transfer had been around for more than a year and a half now — it worked for very basic reporting, but it had some bugs and irritating traits. Google seems to have been listening to the complaints and has recently updated this transfer, addressing most of the main pain points. It is still free to use, so now it is worth considering as an alternative to paid 3rd party connectors.
But enough with the small talk; let's dive in.
Setting up an "app" in Meta's Developer Portal
Unlike with most data transfers from Google platforms, we need to go through some preparation work first to prepare Meta for sharing its data through the API in the first place. Let's see what this entails: visit Meta's Social Technologies Portal to start the process.

If you go to the Apps screen (which is where the link above takes you), you see a "Create App" button in the top right corner. If you haven't set up an app before for Meta, then this page will be empty — if you have, then your existing apps will be shown on the page. Click the green "Create App" button.
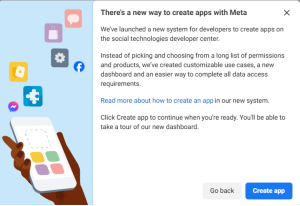
You may be greeted by a popup box like the above; this might disappear or change in the future. Just click "Create app".
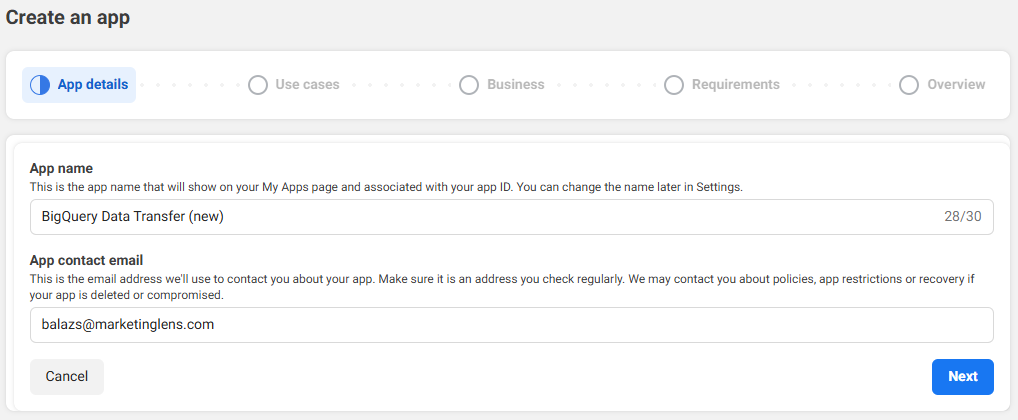
Give it a name and add your email where you'd like to be contacted regarding your app (it doesn't happen often for this use case — not by Meta itself). Note that you can't put "Facebook" or "Meta" into the name of the app. Click "Next".
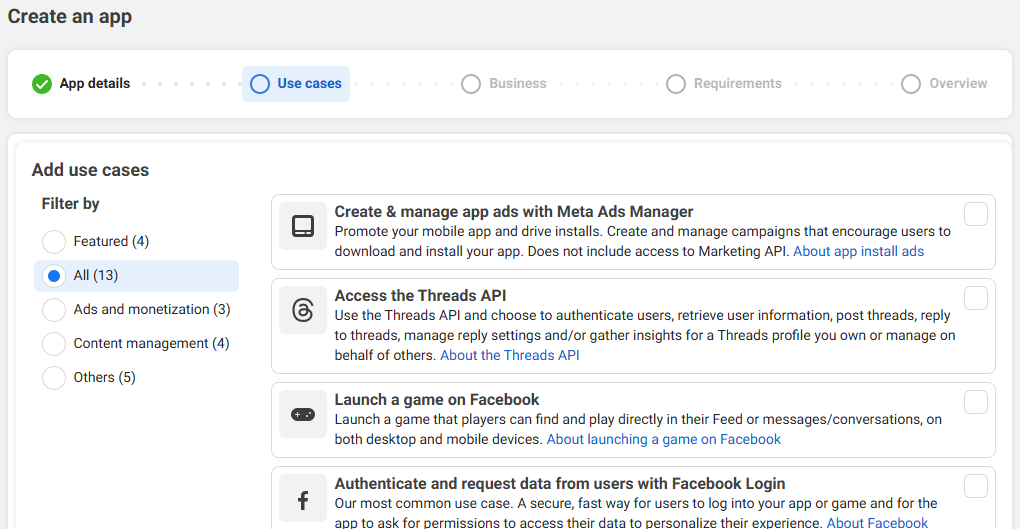
Now you have to declare what this app will be used for. I don't know which option in the list is meant to cover our data extraction use case, but you can just go to the bottom and opt for the "Other" category:
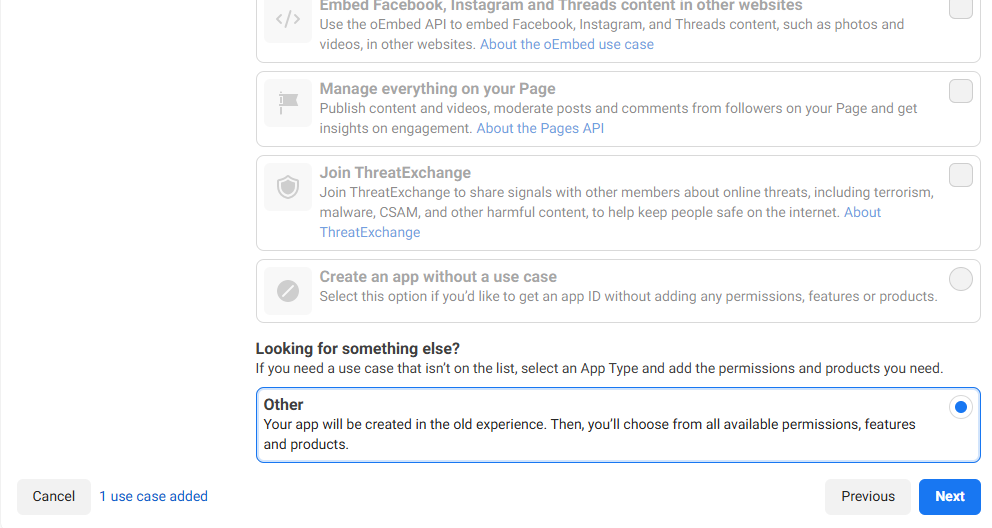
Click "Next".
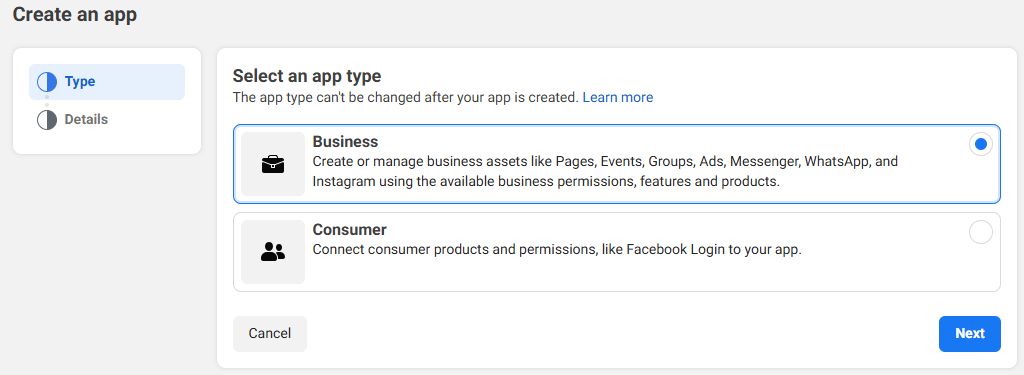
Select the "Business" app type and click "Next".
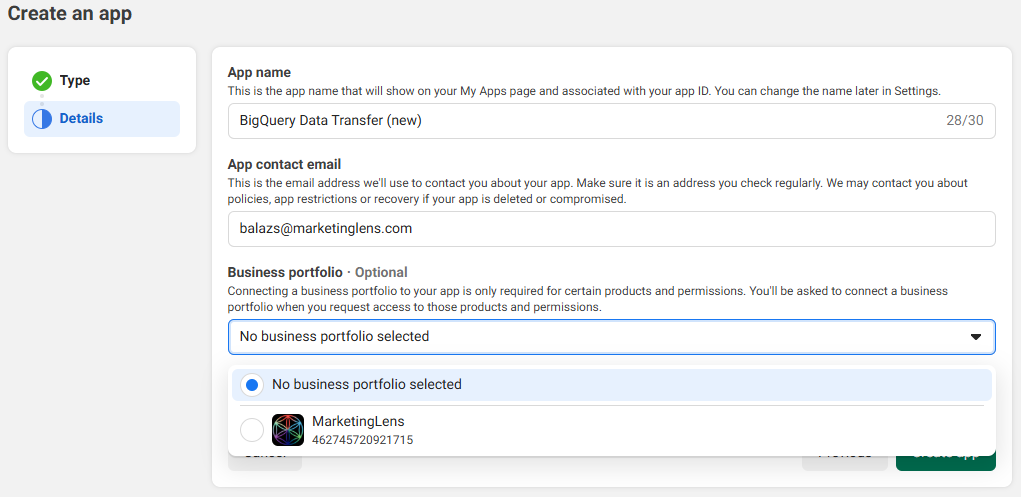
Select the Business portfolio that has the appropriate ad accounts and click "Create App". It will ask for 2-factor authentication.
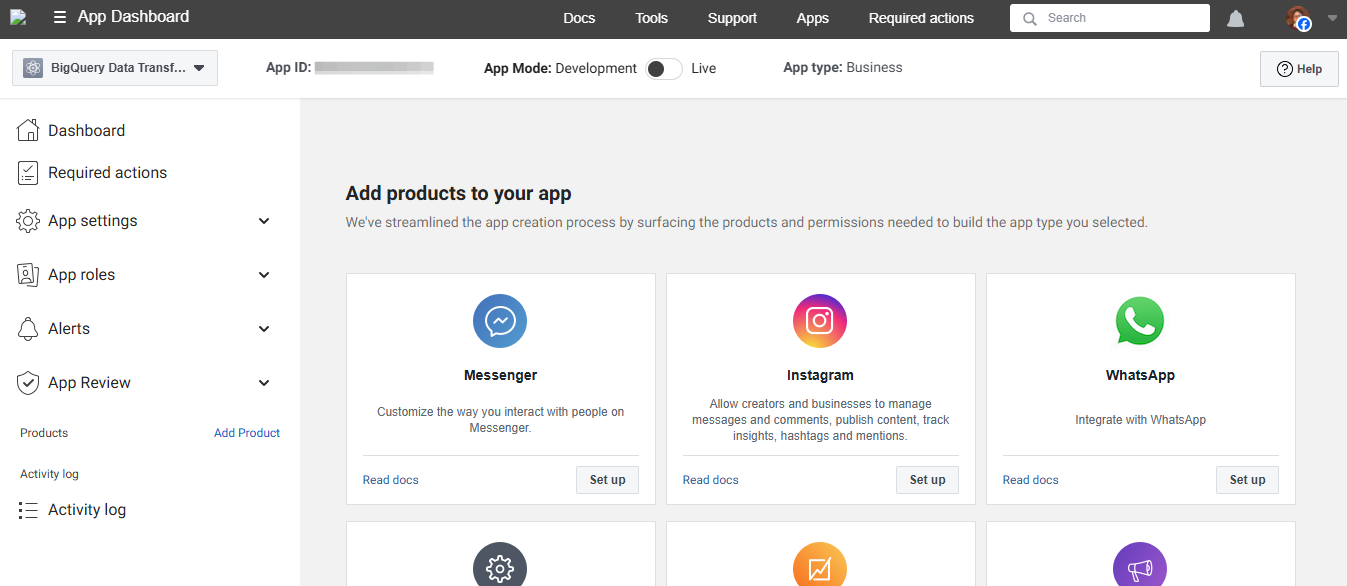
The app has been created, but we're not ready yet. We have to add some products. Before anything else, take note of the App ID and save it down somewhere, so that you know which one is the main app that you've created. This is because the next time you have to visit this portal (e.g. when the access token expires in 60 days), you'll see two apps with the name that you've given this one, with two different IDs, and this way you'll know which one you have to open and edit.
Scroll down. According to the documentation, we need the "Facebook login for Business" product, but I have also clicked the "Marketing API" one. I am not sure this is necessary; maybe try setting it up without that and see if it works. (I did not configure anything in there, just went straight back out to the dashboard.)
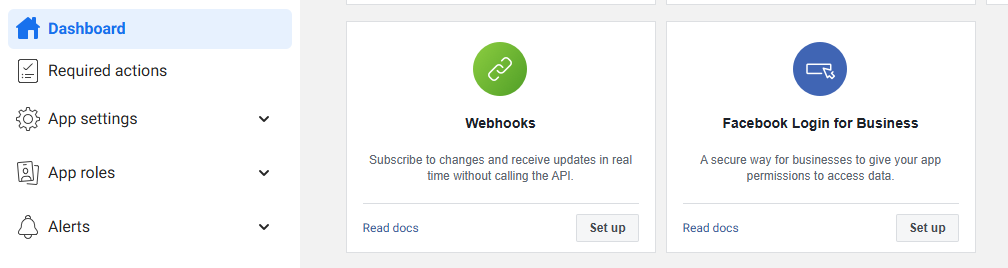
Find "Facebook login for Business" and click "Set up".
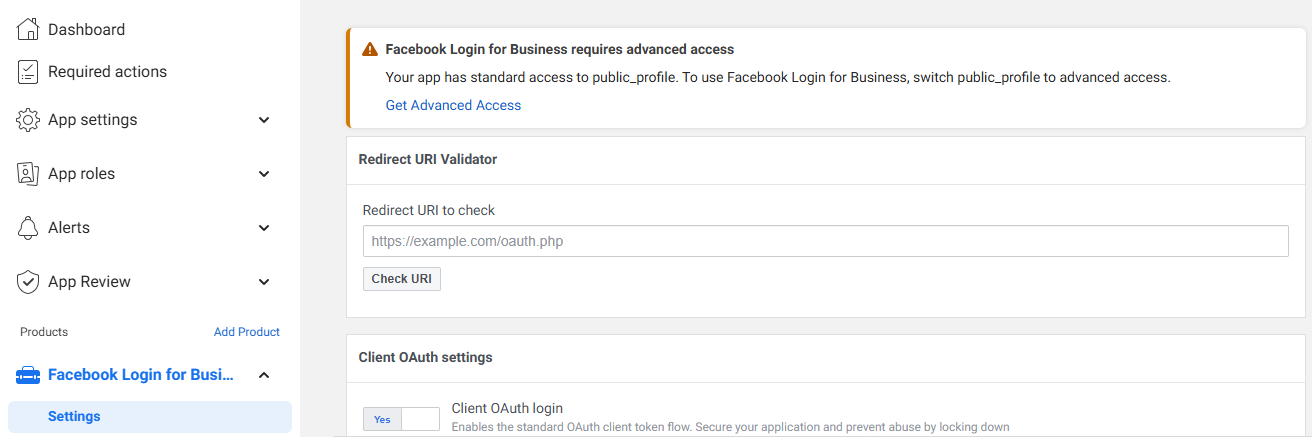
You may get a warning on the top of the page, but ignore it (at least I did and the transfer is working, and Google's documentation does not mention this — although tbh it does not look to be completely up to date).
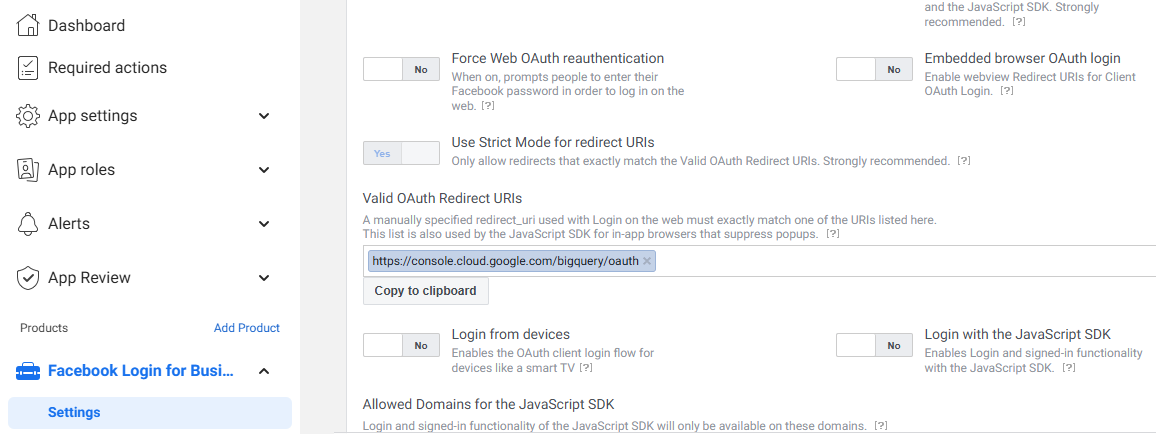
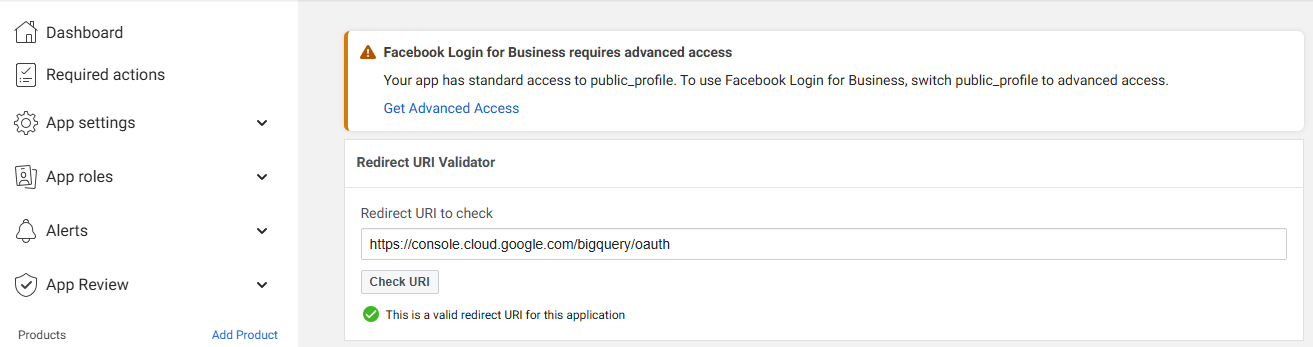
Scroll down and add "https://console.cloud.google.com/bigquery/oauth" to the OAuth Redirect URI list. The screenshot does not show it, but don't forget to click "Save". Then it may be beneficial to test that the transfer URI us whitelist (below).
You may have 1-2 more things to do here which we'll cover later; let's move on to the transfer set-up part.
Setting up the Data Transfer in BigQuery
Create a new transfer (e.g. by clicking "Create Transfer" on the transfer list page), which will bring up the confguration form.
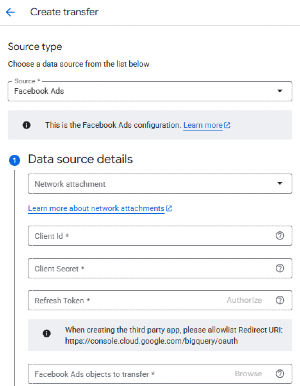
Select "Facebook Ads" from the Source list. You can ignore the Network Attachment field, unless you're in a big org and/or you know what you're doing (and why).
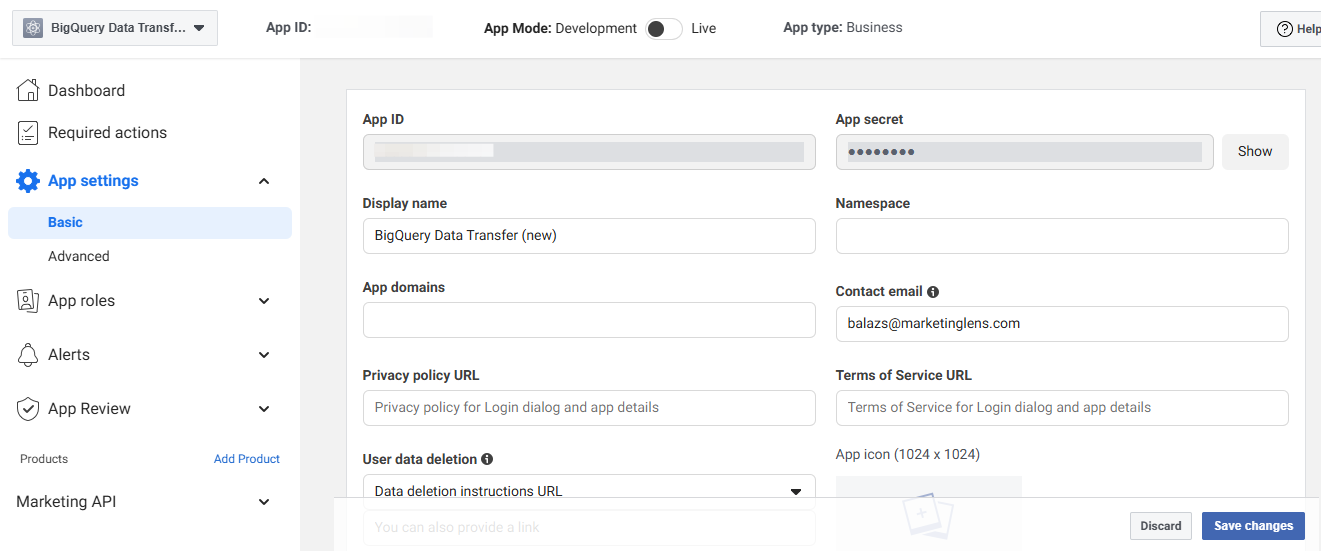
To get the Client Id and the Client Secret, we have to go back into the dev portal in Meta. Go to the App Settings and select the "Basic" view:
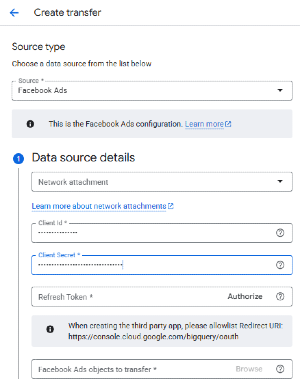
Now we can fill out the Client Id and Client Secret in the form:
Click "Authorize". You'll have to login to Facebook with your account to provide your credentials to BigQuery (with which it will fetch the Facebook data that you have access to).
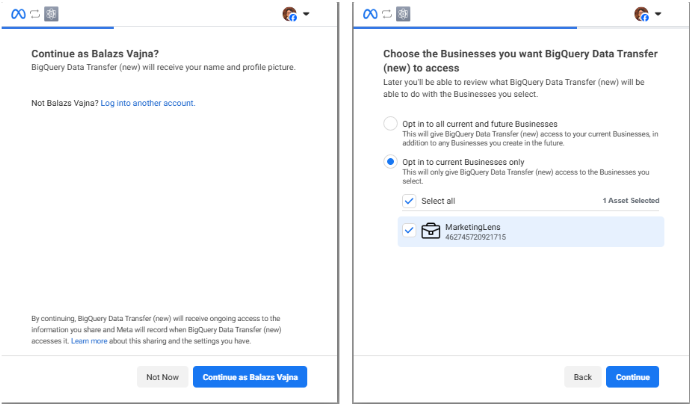
Login to Facebook or confirm it's you when you're already logged in. On the next screen, select the applicable business portfolio.
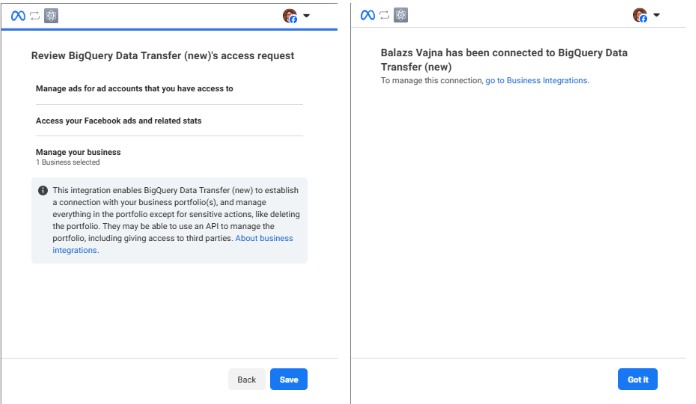
Just click through the rest of the screens and acknowledge the successful connection. The tab will close and the browser should jump back to the transfer setup tab.
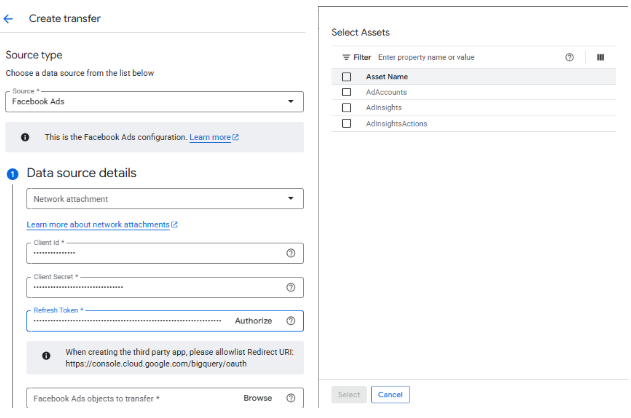
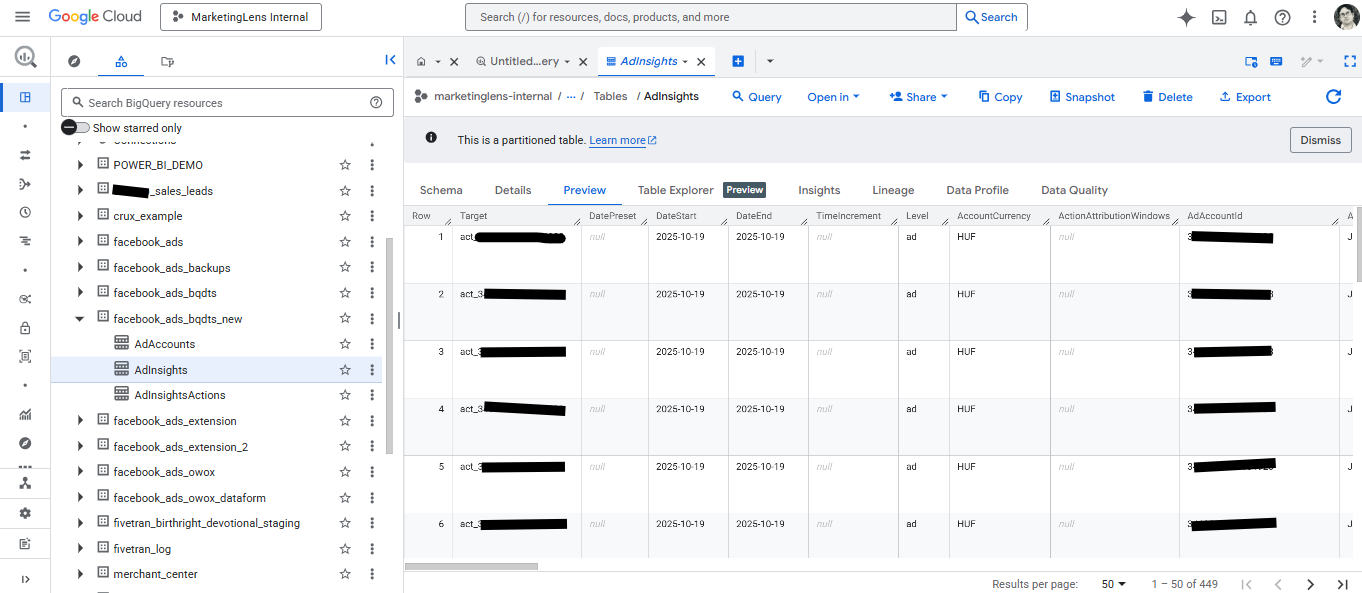
The Refresh Token is now filled. Select the tables you need by clicking on the Browse button under the redirect URL callout box. There are 3 tables:
AdAccounts: (very) basic account information — not too useful, but it gives a good overview of which accounts it loads information from. (Have a look, because it might hold some surprises.)AdInsights: basic statistics about your Meta ads, broken down by the dimension(s) of your choice (I think — it needs some testing and analysis; breakdowns will be added in the following steps)AdInsightsActions: statistics about your actions in particular (~ conversion events).
If this is your first transfer, you'll probably want to include all three. However if you set up multiple transfers with different breakdowns, then this section helps you prevent loading the same tables unnecessarily in multiple transfers.

Small detour: limiting the list of accounts in the transfer
After picking the desired tables, there is a small tickbox that Google recommends you to tick. It is indeed better practice to use it, but only do so if you've done the necessary preparations — otherwise your resulting tables dataset will be empty. We have to make a small detour, back to Meta's developer portal, if we want to avail of this feature.

The Meta app is tied to your business portfolio, and you can limit that app to only apply to certain ad account IDs. To define the list of ad account IDs that should be included (in this case, the accounts that the data transfer tables should cover), go into the "Advanced" section of "App settings", and scroll down a fair bit to find this element, where you can type in the appropriate IDs.
If you've done the above, you can tick the box. This is BigQuery's "lazy" way of filtering the transfer to only specific ad account IDs, the lack of which had been one of the biggest shortcomings previously. Other 3rd party tools would simply offer a list as part of the config setup to pick the accounts you're interested in — the BigQuery transfer does not do that, but at least there is a way to not pull everything under the sun (which is a relief for agencies and freelancers).
Or, just don't tick the box and pull everything, and you can save yourself some work, plus if you add more businesses to your portfolio, they will be automatically included in subsequent transfer loads.
Back to the transfer configuration
With the new update, we can customize what data gets loaded, which previously wasn't available with this transfer. Choose the metrics you want to include in the AdsInsightActions table from the ActionCollections list.
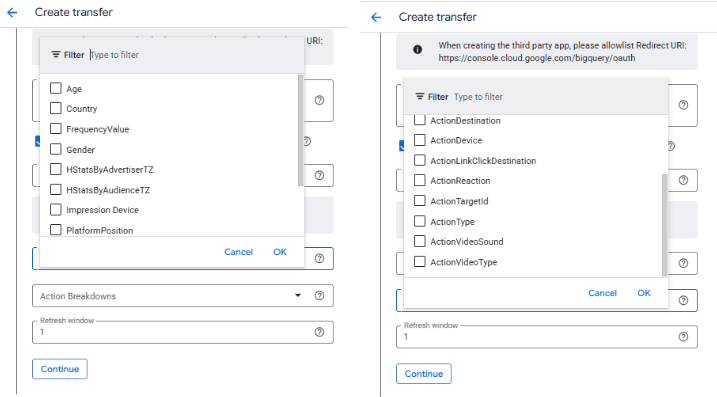
Select the Generic breakdowns e.g. if you want to split results based on region, gender, age etc. Then select the Action breakdowns (e.g. "Action Type" if you want to report on your conversion events). The refresh window determines how many days you want to refresh each day — it's worth setting it to 5-7, because Facebook data (like any advertising platform data) tends to "evolve" over time, especially as more and more conversions come in and get attributed back to the original click (or impression) date. Depending on the typical length of your sales / consideration cycle, you might want to increase the number of days even more. (In the queue, the different daily loads will be scheduled 45 minutes apart from each other.)
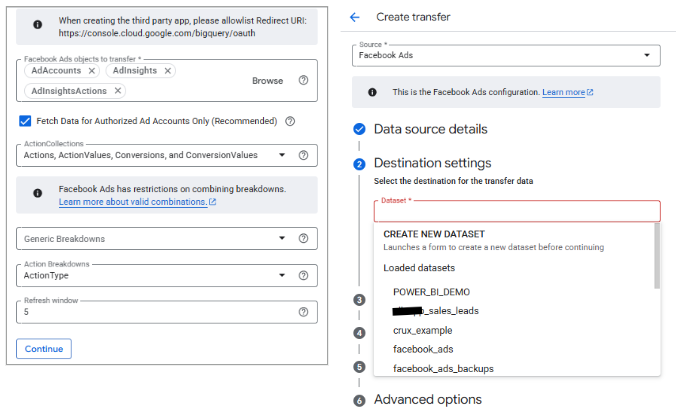
Now we've arrived at the "usual" part of the data transfer setup — it's the same steps from here, but you can read on to see the process end-to-end. Pick the target dataset or open the dataset creation form. In this example, we'll create a new one (which is the more frequent scenario).
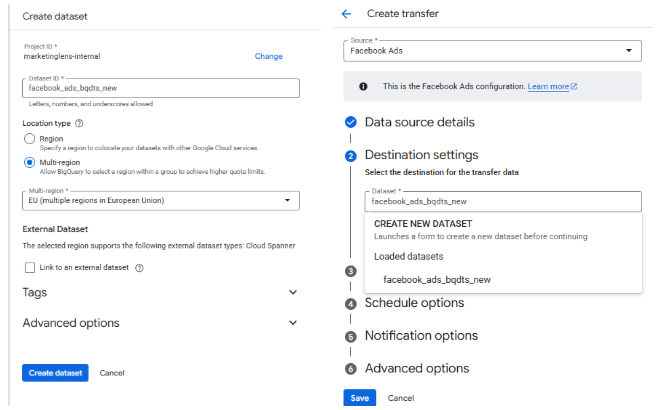
Give a name to the dataset. Don't forget to set the appropriate location (make sure that the dataset is in the same location as the other datasets you are planning to join it up with, because datasets from multiple regions cannot be used in the same query). You can ignore the rest of the config elements in this section.
– the name of the source platform (in this case Facebook or Meta)
– the name of the service (Data Transfer, which 3rd party tool or (which) own API process)
– account ID (in this case you could include the business portfolio ID, which I didn't do in this example)
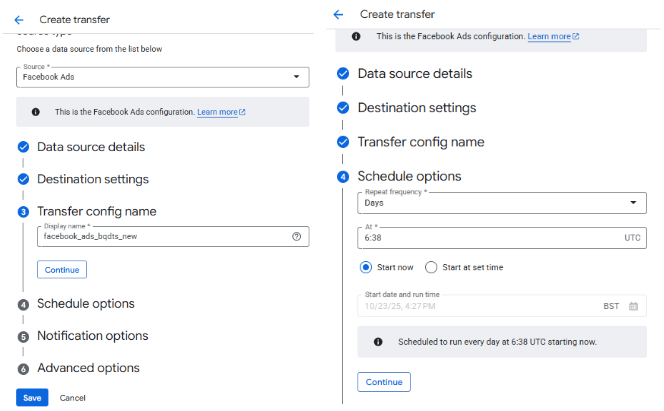
In the 3rd section, give the data transfer process a name, and set the desired schedule time. Bear in mind that the different days within the refresh window will be scheduled 45 minutes apart, and also that you will not be able to manually run backfills while there are any refreshes still waiting in the queue. (This is a limitation of the Facebook Ads transfer specifically — in most data transfers you can add more backfills pretty much as you see fit. I hope Google will fix this at some point.)
You might notice 6:38am on the screenshot above which is an oddly specific time — the reason for this is that I already have an older transfer set up (with the then-default configuration) and I didn't want any refreshes of this instance to clash with that. The Facebook transfers tend to take approximately 3-4 minutes per job, and this approach gave at least ~7 minutes between any two load jobs).
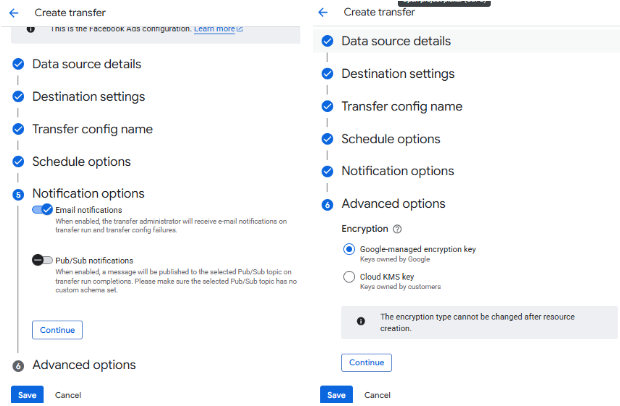
Lastly, click the toggles for Email and Pub/Sub notifications. I strongly recommend email notifications: they won't spam your mailbox, but you'll know immediately when a run fails — and the Facebook transfer does fail every once in a while, sometimes for no good reason ("unknown error"). Rerunning the same day will save you the headache with backfilling (which is usually a breeze in data transfers, but a headache for this one). The encryption can stay as the default one, unless you have a specific reason to change it.
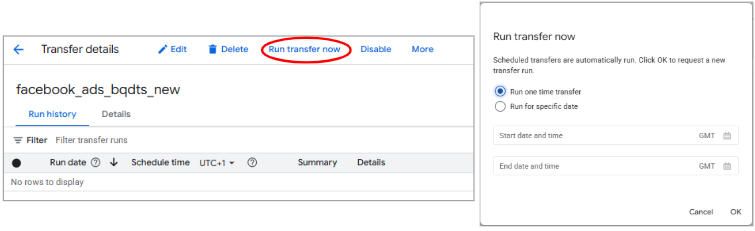
Now we're pretty much done. If you scheduled it for a future time (e.g. 5am next morning is the first run), run the transfer to see if it works. You have to pick a one-time transfer as this transfer cannot do a backfill between two dates.
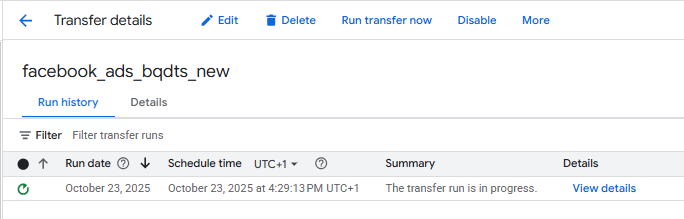
The transfer will take 3-5 minutes to run, though it will fail in a couple of seconds if anything is not OK. Check if the tables have arrived in order (by default, you should have all three — also check that they're not empty, especially if you ticked the "only approved ad accounts" box):
A little bit about the output data
Here is a simple query to get started:
SELECT  AdAccountId,
        AdAccountName,
        CampaignId AS campaign_id,
        CampaignName AS campaign_name,
        DateStart AS date,
        COUNT(DISTINCT AdSetId) AS number_of_ad_sets,
        COUNT(DISTINCT AdId) AS number_of_ads,
        SUM(Impressions) AS total_impressions,
        SUM(OutboundClicks) AS total_outbound_clicks,
        SAFE_DIVIDE(SUM(impressions),SUM(OutboundClicks)) AS average_ctr,
        AVG(Reach) AS average_reach,
        AVG(Frequency) AS average_frequency,
        sum(Spend) as cost
FROM    `yourproject.facebook_ads_bqdts_new.AdInsights` a
GROUP BY ALL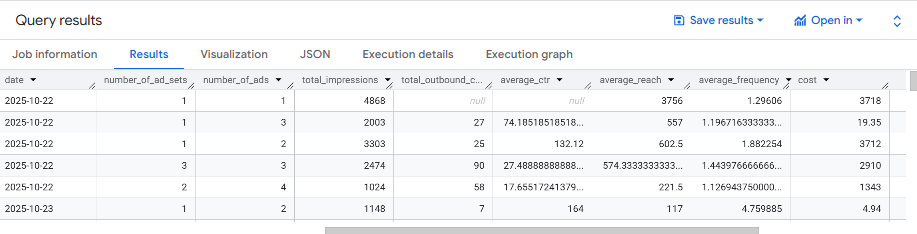
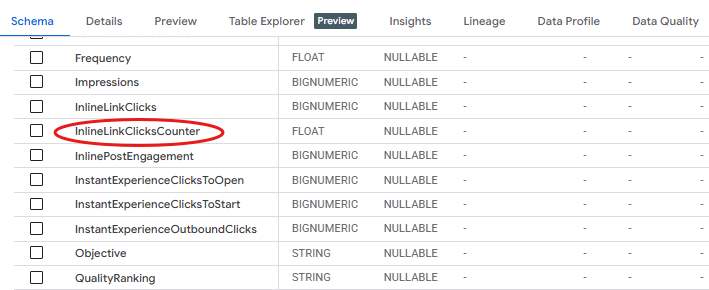
Digging into the structure and contents of the transfer output is a topic for another time, but I do want to highlight one thing: the naming of the "Counter" columns is a bit of a "translation error", it was probably "CTR" originally, and as such, it is actually click-through rate. (E.g. by checking the numbers, you'll find that InlineLinkClicksCounter = InlineLinkClicks / Impressions * 100%.)
Now it's your turn!
I hope you've enjoyed this tutorial and it makes it easier to set up the Facebook Ads Data Transfer. Drop a line in the comments if you have any questions, feedback or suggestions related to this article, or you face any issues that are not covered here.
